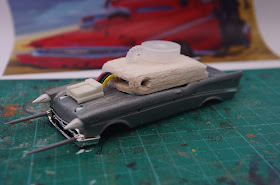
This is where I'm up to in my attempt to recreate the car from the cover of Freeway Fighter from the Fighting Fantasy series:
To get to this stage, I first deconstructed the original car (a 1:43 Chevy Bel Air convertible) from this:
To this:
Using a power drill to remove the rivets which held the body to the under carriage. I then removed all the plastic parts, including the chrome accessories so that I could strip the paint from the original die cast car using Dettol.
Once I had the basic chassis to work with I then started added the bitz, my favourite bit! I like finding (and collecting) things that I may be able to use and have a sizeable bag of bitz horded away for just this sort of futuristic project.
- the spiked additions to the headlights are the tips of wooden golf tees, with some carving on them
- the longer spikes on the bumper are whittled down plastic skeleton standard bearer poles
- the raised turret is a lid from a small plastic pot with a bendy straw for the large pipe
- the front, raised engine is from a computer circuit board (I like the wires as is, but will probably remove them in favour of a bendy straw to match the original illustration
- the guns mounted in the bonnet are some small plastic piping and the smaller guns (which are hidden in this picture - but mounted in the front bumper) are snipped from the end of the metal pipe from a precision plastic cement dispenser.
- the additional roofing is made from 3 layers of balsa wood and will be reinforced with a layer of milliput (I'm unsure how I will get this super smooth yet..)
Oh and here's my new toy, a circular cutter. Just because I'm a geek who loves new modelling tools (I'll probably never use it again!) but it was great for cutting circles out of my balsa and plastic lid.
For comparison purposes and maybe to refresh your memory, here's the original illustration by Jim Burns, an image much loved from my childhood and re-awakened with the release of Mad Max and my preparations for BOYL 2015's DeathRace 40k:
So next I will be finishing the roof with some milliput and constructing the lower front bumper with some plasticard/greenstuff. I'll likely be greenstuffing some of the additional details too. I've found a couple of old plastic Orc spear tips which will serve for the scythes and I'll have to think about how to imagine and then create the rear of the car.
Eventually I'll be sanding the whole thing down and then undercoating white before applying spray coats of Tamiya Clear Red. I hope. I've also ordered some Bare Metal Foil for re-doing the chrome areas (I think this will be easier and look better than NMM chrome painting) but this is all a new experimental experience for me so thankfully the internet has introduced me to the new world of die cast modelling and all their tricks, tips and techniques.
Any advice or suggestions from more experienced modellers would be much appreciated..


No comments:
Post a Comment