Monday, 27 March 2017

Modelling Workshop 1: Town House. White Dwarf 137

Games Workshop's White Dwarf magazines from circa late 80's into the early 90's, really captured my teenage imagination and inspired me to immerse myself in the hobby then, almost as they still do now. I was a particular fan of the Modelling Workshop articles, where for the first time in my life, I was given instruction on how to scratchbuild, which was a step forward from the model Airfix kits I had previously been working with. All of a sudden my pocket money wasn't just to be spent on trips to Reading GW to just buy lead miniatures, but I now tried to get my hands on some foamcard and balsa wood; both of which transformed my modelmaking repertoire. They are still at the core of my scrathcbuilding/modelmaking I've just added extruded foam to the equation.

So armed with the experience I had gained some 25 years ago, I delved back into my old White Dwarfs and re-examined the Modelling Workshop articles. I soon decided that I wanted to tackle all of the fantasy articles from the period (another project to work towards..)! It just so happens that I still own the original Townhouse that I made back then (it's remarkably well made) and I wanted to do an adults version to see if I had improved or not over the past quarter of a decade. It also acted as a demonstration model for my modelmaking club at school, where the students are working on these same designs as well as various Airfix/AoS/40k models.

So for my modern version, I wanted to create a tavern using the townhouse structure. It just meant putting a patio out the front (eventually I'll make some benches and tables), creating a name; The Spotted Dog which is stolen from Fighting Fantasy's City of Thieves and a brazier and barrel for decoration:


Here's my original one, with a few later additions, namely the base, tree and fleur-de-lis. Only the chimney pots are damaged from the original build:


Which version is the better? The green moss looks a bit flat on the new (right hand side) version and the door looks tiny! I think I stuck to the plans much more carefully in my youth and probably spent about three times as much time on it; which is especially apparent on the painting. The new version was painted in about 30minutes (wet in wet and dry brushing - from memory the original took a long while longer). Anyway, I'll let you decide!


A few more angles:


And the original article with all the plans and instructions, as hopefully some of you readers may be tempted to re-visit the making of these classic buildings from our youth:


And finally a few images that I used for research and inspiration. I meant to add some hanging baskets but forgot - they'll go on my next build.


Wednesday, 22 March 2017

Magnetic movement trays and storage

I started doing this after a "prompt" from my missus: "Your models and little men are starting to take up too much room under the bed; I'd like to get some space back for my shoes". Now I was quite happy to be given a hobby related task by my lovely wife and of course I really wanted to ensure she has enough shoe space, so last night I set about trying to rectify the problem.

A lot of my models are in those sponge GW cases which whilst protecting well, do take up a lot of space for a small number of models. Also when they are stored in them, I can't see them and glance over my handy work. I tested the waters with view on getting a Display Glass Cabinet, but it was not met with much enthusiasm - and she does have a point, we don't really have anywhere to put it, certainly not until I get my man shed...

So I got hold of some big plastic storage boxes, found my old bits of sheet and strip magnets as well as my paper steel and set about making some magnetised movement trays that would then in turn be magnetised to the bottom of the storage boxes. Below you can see me working on my ogre unit as an example:

The thin steel paper has a self adhesive layer and was trimmed to fit inside the movement tray which I had already made. Thankfully (from experience) I had the foresight to make the lip of the tray higher than necessary so that the additional layers and bulk of magnet and steel wouldn't leave the models higher than the tray's lip.

Self-adhesive magnets were cut and applied to the bottom of the base.


Some steel paper was then applied to the bottom of the movement tray. In future I would consider actually making the entire movement tray out of steel, so as to skip two of these steps, but for now I'm adjusting what I already have.


The finished, fully magnetised unit.

And in the storage box. I've used strips of magnetic tape across the width of the bottom of the box, again self-adhesive and the movement tray is now firmly positioned in the box. 


Here you can see some further progress with other units. This is box 1 of 2. This box is my "Allied/Mercenary Factions" box; Chaos Allies with Centaurs, Minotaurs, Chaos Dwarves and of course the Ogres. I'll be adding Orcs and Goblins, a Giant and a Dragon to this box.


Next up is my Lost and the Damned Nurgle Army, containing all the units that are represented in the army list from that tome. (Hence why Centaurs and Minotaurs have become Allies). Some Plague Knights, Skeletons, Diseased Flagellants a War Altar and a Plague Cart all need to be added to this box.
So magnetising all of this will take some more evenings, but hey, I was asked to do it! 

(ps. it hasn't saved a great deal of space under the bed, perhaps enough for two extra pairs of shoes, but it is certainly tidier and allows me to take out the box and have a look over my creations...). Win win!

Monday, 20 March 2017

Goblinoid Combat Cards - sculpting shields

As I toil away on a few other, quite large projects, I decided this weekend to have a break from painting and break out the greenstuff. I wanted to make the shields on my recreations of the Goblinoid combat cards, in relief, as I've always admired the shields of Kev Adams and Fraser Grey who did this originally. It's a chance to test my sculpting skills and to add my own twist to the iconic Goblinoids rather than a direct copy of the originals, which is what Jeff is doing in his same project (he started way before me though). The skin colour, when I come to paint these, will also be in my own style rather than the lurid greens on display on the cards.

When sculpting, I used very small blobs of greenstuff in the way that I watched Kev Adams work last summer. Building up in small increments from lowest areas to most raised seemed to make sense. Using some small sculpting tools I was able to shape the forms of the face before adding a last layer of detail when all the base work was complete and solid.

So first up, with an actual bead for a beady eye; a jolly shield, winking at us:


Followed by a backhanding, horned skull:


(Halfway through sculpting this, I realised that the horned skeleton was posed giving a backhand slap - needless to say it was way too difficult to sculpt this!)


And then the epitome of angry and evil:


And finally a burning skull:


This was a fun few hours/afternoon's worth of work and working on such a small scale has given me some added confidence going forward with my sculpting. The next shields I'll sculpt will be more in the Fraser Grey style, much more rounded, smooth and exaggerated features...


Tuesday, 14 March 2017

The Bestiary of the Exalted and the Unfortunate

Quite a while ago, over at the Oldhammer Forum, I signed up for a community project to create a conversion for each of the entries from the list of random Champions found in the Lost and the Damned book - a serious undertaking! There are already a host of excellent and imaginative conversions and paint jobs on that thread, so the standard is set pretty high.

I chose this particular entry with a host on interesting attributes to create, for my first go:


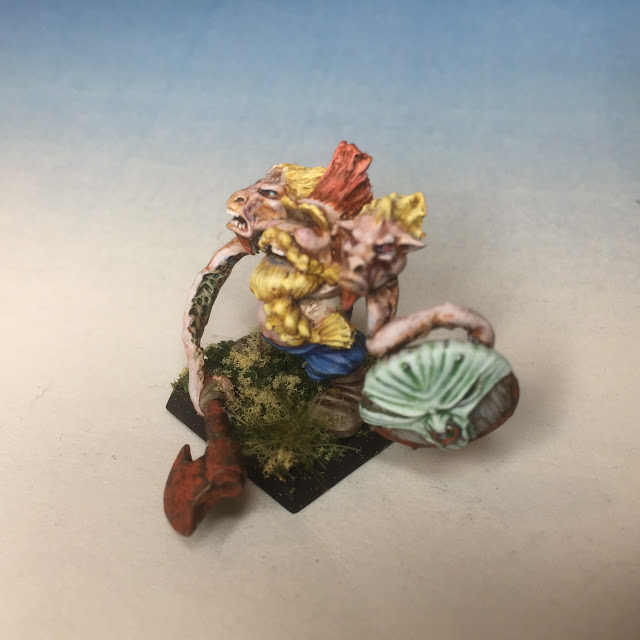
160 --- Dwarf --- Horrible stench, all arms tentacles, multiple heads (3), bestial face on 2 heads (goat) and featureless head on 3rd

I had an unwanted Marauder Dwarf troll-slayer lying around ready to be mutilated! Only recently I was reminded of my participation and so therefore bought my conversion out of the depths of my "to paint" tray and, well painted him:


I went for a realistic skin tone and alternative blonde/ginger hair for the beards and hairstyles so as to not make the model too busy with lots of bold and vibrant colours. The cool blue of the trousers were deliberately chosen to counter the other warm colours used.


The conversion was pretty simple really; some careful snipping off of his arms, some delicate gouging of his eyes and nose followed by some wire pinned into position for where the tentacles would go. The two beastmen heads were glued in place and some greenstuff used to sculpt the tentacles around the wire armature. The weapons were finally added and then all the gaps were filled and some additional hair sculpted to hide some of the unsightly gaps between the multiple heads.

His backstory?:

From a young age Bromni eschewed all contact with his kin; their mundane conversations, lowly ambitions and monotony of routine angered him. As soon as was possible he up and left, leaving his family without even a goodbye. He had decided to go on grand adventures, explore the world and live life to the full. It was of course destiny that he should eventually join up with a cult of dwarfs known as Trollslayers; those destructive warriors that look to defeat their enemies or face certain death. Working alone with just their axe as company. This was perfect for Bromni.

And he was good at it. Trolls were slain and his reputation as a fierceome slayer grew. He hated the adulation that he started to receive - other adventurers seeking him out, wealthy Dwarves looking to offer him money to fight their enemies, so it was unsurprising that Bromni withdrew further from civilisation and wandered further north into the chaos wastes looking for a true fight. 

Everything changed for him one fateful day. He had tracked down a group of trolls to a marsh somewhere in the realm of chaos. But, unbeknownst to Bromni these trolls were led by a powerful sorcerer. Bromni slayed the seven trolls after a fierce fight and was cleaning his axe when the sorcerer returned from an errand. He feigned ignorance of the trolls and instead showed Bromni exaggerated respect and offered the young dwarf an ale. Over the ale the sorcerer skillfully asked questions of Bromni and discovered his desire to fight bigger foes and his disdain for company. The sorcerer saw his opportunity to punish the Dwarf, casting a multiple head spell, where the heads of the next two enemies slain by the dwarf would begin to grow next to his own head. It was not long after this chance meeting that Bromni slayed a warband of beastmen and of course the heads of two of these beasts began to appear from his shoulder. The horror of this situation broke the young dwarf and he wandered for days with the constant chatter and braying of the beastmen always accompanying his every waking moment. It was of course no surprise when the sorcerer re-appeared and offered Bromni salvation as a follower of his chaos god. The path to damnation was set....


Monday, 6 March 2017

Retinue table challenge - 4 Harpies


Another one finished for my Lost and the Damned Retinue Table Challenge - D4 Harpies. Only the Minotaurs and Skaven to go now before I'm done.

I've been enjoying getting back into my converting, rather than just painting old miniatures and this was no exception. The Goblins from the LotR range are nicely mutated with some interesting shapes, textures and poses to play with. I simply removed all the weapons to go for a more feral appearance and substitute them with some bones and heads to show their primitive and evil ways. The wings are from a variety of sources (all bitzbox) as I'm trying not to buy any new models for a while and work on the backlog. The curved wings on models 1 and 3 are from some Reaper Bones female statue/angels that I had knocking around and model 2's I believe are from a Dark Angels sprue and the model 4 from an old dwarven banner top.

I had previously considered a range of different models to create the Harpy look, but none of them really fitted too well with the Nurgle theme of my growing collection. I nearly went down the more feminine/avian look, with sculpted boobs and claw feet from plaguebearers, but realised quite quickly that this was a lot of extra work for very little return. Who says Harpies have to be female? A small compromise (and to add some gender ambiguity) I sculpted some longer hair!

This is my first attempt at basing flying models, I only briefly contemplated using the transparent, plastic flying stands before thinking along more creative lines. Initially I was thinking of having them perched in trees, or about to fly from a branch, but the prospect of making four trees from wire was a bit daunting and could easily look shit. A much easier solution was to create rocky outcrops from some extruded foam off-cuts from my dungeon tile project. With a pva/sand coating they were quickly textured to look like rock faces. Easy. I just had to delve into my diminishing pile of skulls for the final decoration to the bases.

WIP - you can see the small conversions and the extruded foam/sand combo for rock form and texture

The image that inspired my idea - apologies for not being able to give credit to the creator, but my these are awesome.


Wednesday, 1 March 2017

Forstgrave bestiary challenge - rats and a blood crow


Sometimes the smallest creatures can provide a whole lot of nice detail to a game. You have to have rats lurking in a corner of a dungeon or creeping around some barrels of a street corner. And of course the lowly adventurer likes an early, easy kill. The crow certainly adds a bit of flavour, not just with it's dark, brooding and menacing pose but with the addition of a perch - in this case a damaged signpost for the city of Felstad. 

The Rats are Reaper bones (very cheap with just enough detail), the dark three primed black, highlighted up with greys/browns on the fur and a touch of Elf Flesh - Bleached Bone on the skin. Albino rat was primed white, washed with Baal Red and then highlighted up with very pale pinks (from a Titallating Pink base with added white).

The crow is from the metal Nurgle Lord kit and has been in my bitz box for years (quite surprisingly as he adds a fair bit of character and could have been used for a whole host of conversions or basing/scenery). Well he gets his time as his own model now, rather than supporting another and was painted onto a black primer, highlighted up with some greys and then glazed with some blues and purples. The wooden sign was kept deliberately pale with Graveyard Earth as a base and highlighted with very pale greys. After the freehand writing was applied it was washed with some greens and browns to create a weathered look.

Some quick paint jobs but pleasing to cross off another two requirements for my Frostgrave Bestiary Challenge.