Wednesday, 31 July 2019

Scalextric Restoration part3

The last (possibly?) of these posts where I try and improve some of my old Scalextric cars using the skills and techniques I've learnt through my hobby journey. These two were quite straightforward as I really only wanted to improve the appearance of these pretty ugly vehicles and see if I could also improve the performance too. Here's the two finished cars:


A Metro and an Escort Xr3i were chosen, which originally looked like this:
And this:


I wanted to change up the colour scheme of the Escort, using yellow, quite simply because none of the other cars are yellow and because I wanted to try and improve my masking tape and aerosol technique. After a bit of work with the paints and the decals (and a couple of Lego bits for fog lights) I ended up with this:


I also put a bit of lead weight in the front end to improve it's performance (I'm very much against magnets...)

And for the Metro I ended up with this:


Where I created a spoiler out of plasticard, added exhausts, resprayed the trim and repainted the interior. But no matter what I did it still runs badly as it's way too top heavy and does not like cornering at all. I see that as a challenge to race against my sons magnetised Sierra Cosworth!

Back to some miniatures next!


Monday, 29 July 2019

Scalextric Restoration part 2

Even when I was a kid, I liked the idea of weathering models to create a more realistic and less plastic looking toy. Unfortunately I wasn't very good at it then (no online tutorials to read..) and for this poor old Scalextric Capri I used sandpaper and a scalpel to physically distress the model. It's taken me some time to restore this one. Here's how it looked when I recovered it from my parents loft:


As always I researched inspiration and looked for a classic Capri design that i could work towards and in this case went for the following due to it's strong pattern and complementing colour scheme.


I added some plasticard to the front to make new raised indicators and a space for the lights (more on that later) and glued together some of the cracks and splits:


I handpainted the wheels white as to match my image above:


I went about sanding and polishing the body to get it as smooth as possible again, removing evidence of my old approach. I then added some plasticard to create some raised indicators and found some circular red plastic bits to make the fog lights. Here you can see the first application of white primer too. It received two coats of spray primer with a fine sanding in between:


For the lights I decided I didn't want to have just flat shapes and ust by chance, when in Hobbycraft buying some tie-die for my daughters I saw these adhesive gems for a few quid. perfect:


Here you can see them applied (slightly later in the build process):


The interior of the Capri also needed some updating, so it was primed black and then the driver was hand-painted with acrylics:


And then came the lengthy process of painting the bodywork using Halfords car spray, masking tape and (eventually) some freehand..


As you can imagine it was very difficult to get exactly perfect straight lines with the masking tape as there was always some bleed of white into blue or vice versa. Eventually I just used some Tamiya clear blue and painted a straight edge along the masking tape and then did the same with the white! I think an airbrush may be needed going forward....

And then came a first for me, some soldering! I picked up a cheap solder iron from Amazon and reconnected the damaged wires to the motor. Amzaingly this worked first time and the car was functioning after 30 odd years! However the rear pinion was split and this was also changed to a new one:


One of the last bits of model-making problem solving was going about replacing the damaged windscreens. I thought about molding and then casting in thin resin, tried warping transparent plastic packaging with a hair drier and eventually plumped for the less ambitious but perfectly acceptable cutting out of acetate and vigourously gluing it into the curved shape of the windscreens:


Here's the completed bodywork with old Scalextric decals applied; the Ford logo, registration plate and the car's rally number on the side. Those stripes were fucking fiddly:


And finally ready for a few coats of satin lacquer:


And here on the race track:


The painting on the bodywork doesn't stand up to close scrutiny, but it will pass for now with the materials i had to hand. Getting perfectly straight lines on patterns is a real pain in the arse and has convinced me that an airbrush is essential. Next time I would also like to make my own decals using the appropriate inkjet paper to fully personalise our cars.. I've got two more restorations in progress, that I will share another time; a Metro and an Escort.

Friday, 5 July 2019

Scalextric Restorations

For my sons birthday this year I decided to give him my old Scalextric which I had found in my parents loft a few months ago. Thankfully most of it was in a good condition, certainly the track needed just a quick clean, the hand-controllers and power worked fine and a couple of new cars were bought so that he had some that were fully working on his birthday. It was my old cars that needed the most work and although not quite on the model-making scale of the castle he received a few years ago it has provided me with a new, yet familiar hobby task; a need to collect old bits and pieces, problem solve how to use a range of familiar and unfamiliar materials and techniques, referring back to old classics and of course a new addition; the need for them to be functional!

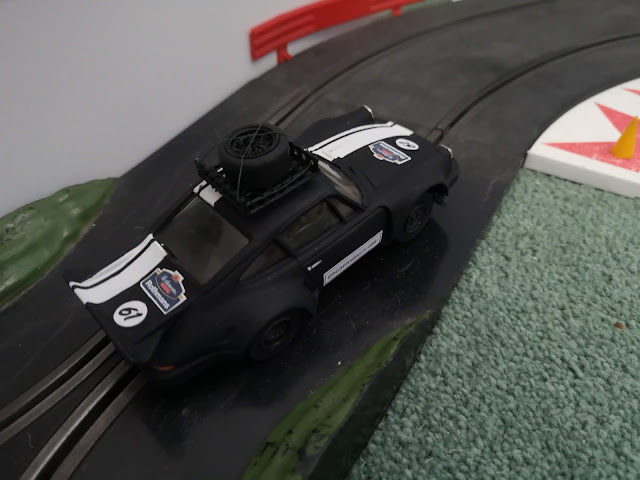
Here's a photo of the scrapyard and I decided to start with a the Scalextric Porsche 911 from the 80's; when I started this project it looked like this (bottom left corner). Scratched, missing lights, back axle, cogs and just in a general poor state:


To make it function as a slot-car I needed to buy some new axles (the original front one was bent), fresh tyres (the original ones were hard and cracked), some new gears/pinions (the originals had lost teeth and cracked) and some new pick-up braids. Thankfully these are all easy to source on the internet and very easy to fit. My next restoration project a Capri, will feature some soldering and electronics, which I am quite excited about as a more difficult challenge.

Once these tasks were completed and I was satisfied that the car was functional (after a quick practise) I went about the cosmetic changes. After thoroughly cleaning the inside and out with warm water and washing-up liquid, I began the painting process. A black undercoat of our friendly Halfords matt black primer that has been used multiple times on my miniatures, the car then received a nice matt black coat. I then wanted to add some racing patterns and broke out the masking tape and white aerosol to create an off-centre, white, double, racing strip:


I then found a couple of lights that fitted perfectly, left over from a previous build of Fighting Fantasy Freeway Fighter and then went about creating a roof rack for a spare tyre from some plastic mesh:


The next stage was to make some decals including racing numbers, sponsors and registration plates. I went with Rothmans Racing as some research into 80s Porsche 911 Rally cars had some examples with that as their sponsor and it just seemed to fit:


 These were printed off on an inkjet printer and attached in these positions:


You can also see a bit more detail of the tyre rack here, including the thin wire I used to recreate the straps that would hold the tyre in place. Here's my inspiration:


Several coats of matt varnish later and it was completed. Here's the car where it's supposed to be, on the track:


Thursday, 4 July 2019

Sci-Fi trash bashing scenery 2


Here's my second trashbash build, a slightly more complicated build than my last effort, but also a generator of some sort. This one is made from a Gillette shaving pack that I was (fortunate enough) to get at Christmas and when I took the different parts of the gift out of the packaging I was confident that I could create something Rogue Trader / Post-Apocalyptic with the variety of shapes. Here's the completed piece of scenery with a MadBoy for scale:


Here's the original packaging from the inside, you can see a nice array of shapes and textures on the plastic:


And here's the completed build with bits of sprue, lego, textured plasticard, bottle lids etc for added detail:

And that magical moment when all the different components come together, united under the grey primer:


The painting was pretty quick and nasty on this; after the grey priming everything was given multiple washes of a variety of reddy/brown/orange washes for the rust colours. The colours of paintwork were then added with the usual dark to light technique and then further rusty colours were stippled and diluted on to create either thick rust with the former technique or washed out rust with the latter. A few green washes were added for further weathering and then it was all based with some desert dry pigment which was also added around the base of the structure to make it look as if the sand was embedded in the build; residues of a previous sandstorm maybe.


A new twist on my hobby time looms next......