Showing posts with label Basing. Show all posts

Thursday, 17 December 2020

My Magnetised Movement Trays/Display base (a tutorial)

 For some time now I've been making my own magnetised movement trays/display bases for my Lost and the Damned army, and as I was making one for my unit of 49 Diseased Flagellants I thought it would be a good opportunity to do a quick tutorial of what works for me. 


I magnetise both the top and bottom of my movement trays, the top obviously so that the models stay in place, the bottom so that all my movement trays can be safe in a large storage box and don't move about when in transit. Photos of that arrangement at the end. Now I realise that I could have saved a lot of time if I had made the tray out of steel and just applied magnets to the models and to the base of my storage box, but I went this way first and besides, steel is more difficult to work with.

Below you can see the tools and materials you will need for the basic construction of the movement tray:


From left to right: self-adhesive magnetic paper (thick), steel paper, balsa wood, 3mm plywood, thin polystyrene, pva glue, superglue, pencil, scalpel, metal ruler and scissors.


The first step is to cut the plywood to size. I used plywood as unlike card, it doesn't really warp and is easier to cut than steel. For this task, I knew that my unit was to be made up of 49 models (ranked 7x7), each on a 1 inch base, so the first dimensions drawn on were 7"x7". However you need to leave space for the movement tray edge, so here I added a 1/4" all around. So the overall size of the tray is 7 1/2" square.

Once the plywood was cut with a saw, I then measured (7.5" square) of the self-adhesive steel paper, sufficient to cover the bottom of the entire movement tray. This was drawn out and cut with scissors.


Back on top of the tray I then measured and cut a 7" square piece of the self-adhesive steel paper. This leaves a border for the balsa edges to be added. I find that balsa's ease of cutting is perfect for this. I use balsa that is slightly thicker than a warhammer base, which compensates for the raised height of the steel paper. Below you can see my measured and cut edges. 


These are simply glued in place with PVA and a stack of books added for weight to ensure a strong bond. Choose your books carefully and never use your best book at the bottom for fear of seeping pva! I used some of my wife's hardbacks at the bottom!


Here's the finished construction:


For the miniatures themselves, it is just a case of magnetising them. However the 25mm (1") bases are hollow, so they need filling. This is where the foam/polystyrene is great. I just superglue it in place:


And then cover it with an inch square of magnetic paper.


Here you can see the models on their movement tray and held at an angle. I could probably hold them upside down with the strength of the magnets:


Finally the movement tray is based to match my Lost and the Damned army bases. 
1. Paint the base colour brown (earthy colours as sometimes you can see this through the yet to be added foliage)


2. Then a dark green Woodlands Scenics is pva glued into place:


3. For the two subsequent layers of lighter green foliage, the pva glue is diluted with warm water and a few drops of washing up liquid and applied using a dropper bottle so as to not disturb the layer that is already glued in place:


4. The two lighter shades of green are sprinkled on, avoiding any large clumping:


5. The final movement tray with scatter leaves and clump foliage:


And a close up shot:


Can’t wait to fill this with all the flagellants I’m currently kitbashing (I’ll share these in my next post).

Sunday, 7 June 2020

A Great Unclean One (based on the LatD illustration)


There's an Oldhammer project happening at the moment which is to create something from one of Tony Hough's amazing illustrations. Now a lot of his work is 40K based and therefore not for me, but having scanned the wonderful images in the Lost and the Damned, I came across one of his illustrations of a Great Unclean One, on page 12. It's certainly an illustration which I'd seen before but it's not until I have a ulterior purpose that I actually stopped and studied it properly, even more the case when I'm about to create a sculpted version of it. 

Now I'm not usually one to post wip photos, but I'm particularly happy with this as it's taken a fair amount of work, thought and observation. 


Part of the thought process for this type of project, is about what materials, parts, bits, models etc to use. I already owned an incomplete classic, 3rd edition Citadel GUO and I had the head of one of the more recent ones (from some old project many years ago). Now it's a head I don't usually like but I could see a resemblance to Tony Hough's drawing, both in terms of the wide shape of the head, the wide, toothy grin and the shape of the horns. Hopefully you can see that here:


To complete the scene I needed a couple of naked admirers and found these courtesy of Hasslefree miniatures. Both have had head swaps, the female heads being snipped away and a skull and a Tyrannid(?) head replacing them.


With the miniatures all gathered it was time to do some cutting and sculpting. The classic GUO legs section was far too narrow for what I had in mind, so I sawed through it, off centre in an area lacking in details, in order to space and then bulk out the gap between. I then wanted to change the pose of his left arm so made a snip at the wrist, so as to reposition it. I didn’t own a right arm and looked briefly on eBay but wasn’t willing to pay £15 for one, so decided to fully sculpt that appendage. As always Nurgle sculpting, thankfully, is quite forgiving!


The next stage was to start to put it all together, to see whether I could actually realise my intentions and keep it as close as possible to the illustration. This involved a fair amount of careful drilling and pinning to join respective parts together and to make a solid base for all the sculpting to follow. Here you can see that I chopped off the original horns and inverted them so that their shape was more reminiscent of Hough’s illustration and removed his goofy bottom jaw so the head sat more comfortably on the torso without any sign of a neck. You can also see the armature for the right hand here. I had the torso of the GUO ready to go without any changes (yet). The left leg had to be substantially repositioned, so an admirer could fit on his thigh, this created quite the gap and quite the forward step, but I figured I could reduce the space by extending the belly outwards to fill the gap.


Thus began the process of sculpting. I started off with milliput to bulk out the model and fill all the gaps (sorry no photo here, I was in a sculpting frenzy and didn’t want to stop the flow) and then green stuff for the details and texture. You can see that I’ve added a plastic tongue (from the Giant set?) and lots of postules made from dried seeds, pushed straight into the wet green stuff. At this stage I had to make a crucial decision - do I sculpt over the lovely mouth belly to maintain the Hough homage or do I keep it exposed for nostalgia sake? Obviously the former won out. Here you can also see me experimenting with the GreenstuffWorld green stuff roller to create some of the ribbed intestines protruding from his open belly.


There are lots of little details in the illustration that I wanted to include in the sculpt, so I will share those here too, as these are intrinsic to trying to capture Hough’s style of work. When an earlier wip photo was shared on the Oldhammer Facebook page, it highlighted that the illustration seems to be quite renowned for the uzi toting Nurgling that hovers in the top left corner of the picture. So I found an old spore (?) model and sculpted over it to create the Nurgling. The top hat is made from a plastic tube off cut and a circular bit of plasticard for the brim. The uzi is the nozzle from a gun off the Gaslands sprue and a snip off a cable tie:


Here you can see, in more detail, the lounging admirer. A greenstuff tongue was added as if to lick the man breast and some hair and spikes adorn her head. Her left leg also had to be snipped and repositioned at the knee to both fit on and to represent the illustration. You can also see a tendril wrapping itself around her other knee and the completed belly, sans mouth.


A close up of the head shows some tiny rolled maggots infesting his horns as well as a four legged, hairy skull creature on top. I was really pleased with the sculpting of the GUO’s head, I think I hid the goofy, quizzical look of the original sculpt and created a more sneering, malevolent look of the illustration. You can also see the sculpted bile coming from his mouth, this will be added to with some stringy UHU glue after painting. 


I had to think carefully about how to create all the webs and strands of organic goo that drape off the GUO. I had a eureka moment when the vacuum cleaner got clogged with a long, thin piece of string, so used it here, soaked in pva to make it solid. I also found some tiny roots from some moss that I had in a baggie and used them to dangle from his right hand. 


And from the back, not quite so much detail here, but you can see some beads squished into the milliput sculpting.


The last part was the base. Now this is me breaking my own rule (to a degree). I’ve never really appreciated display plinths, much preferring models to be properly based, but I was given this wooden one and decided to use it here. I’ve compromised by also basing the model on a round 60mm base and then magnetising both so that he can be separated from the plinth. It seems to be a sound solution...
Both bases required some added detail and interest, so I got to work with the greenstuff roller and made some more worms to scavenge around in the foreground and hit the bits box for a range of organic looking bits. In fact I delved to the very.p bottom of the box and pulled out some interesting shapes of off cuts and unwanted pieces, including bits of horn, a pouch, some sort of lip thing and bits of resin skull. On the left is part of a GW familiar, on the right a resin chap with gas mark that I was given at a meet up, sorry I can’t remember who. Obviously there is an old Nurgling at the forefront because it’s just too cool and a mistake of Tony Hough’s not to include one there!


So there we go, the model is made. I’ve just undercoated him today with a zenithal undercoat of grey and white and my intention is to monochrome him (adding a dark wash for shadows first) then with just some washes of very subtle colour, in an almost illustrative style. Hopefully my skills are up to the job, we shall see!

Sunday, 10 May 2020

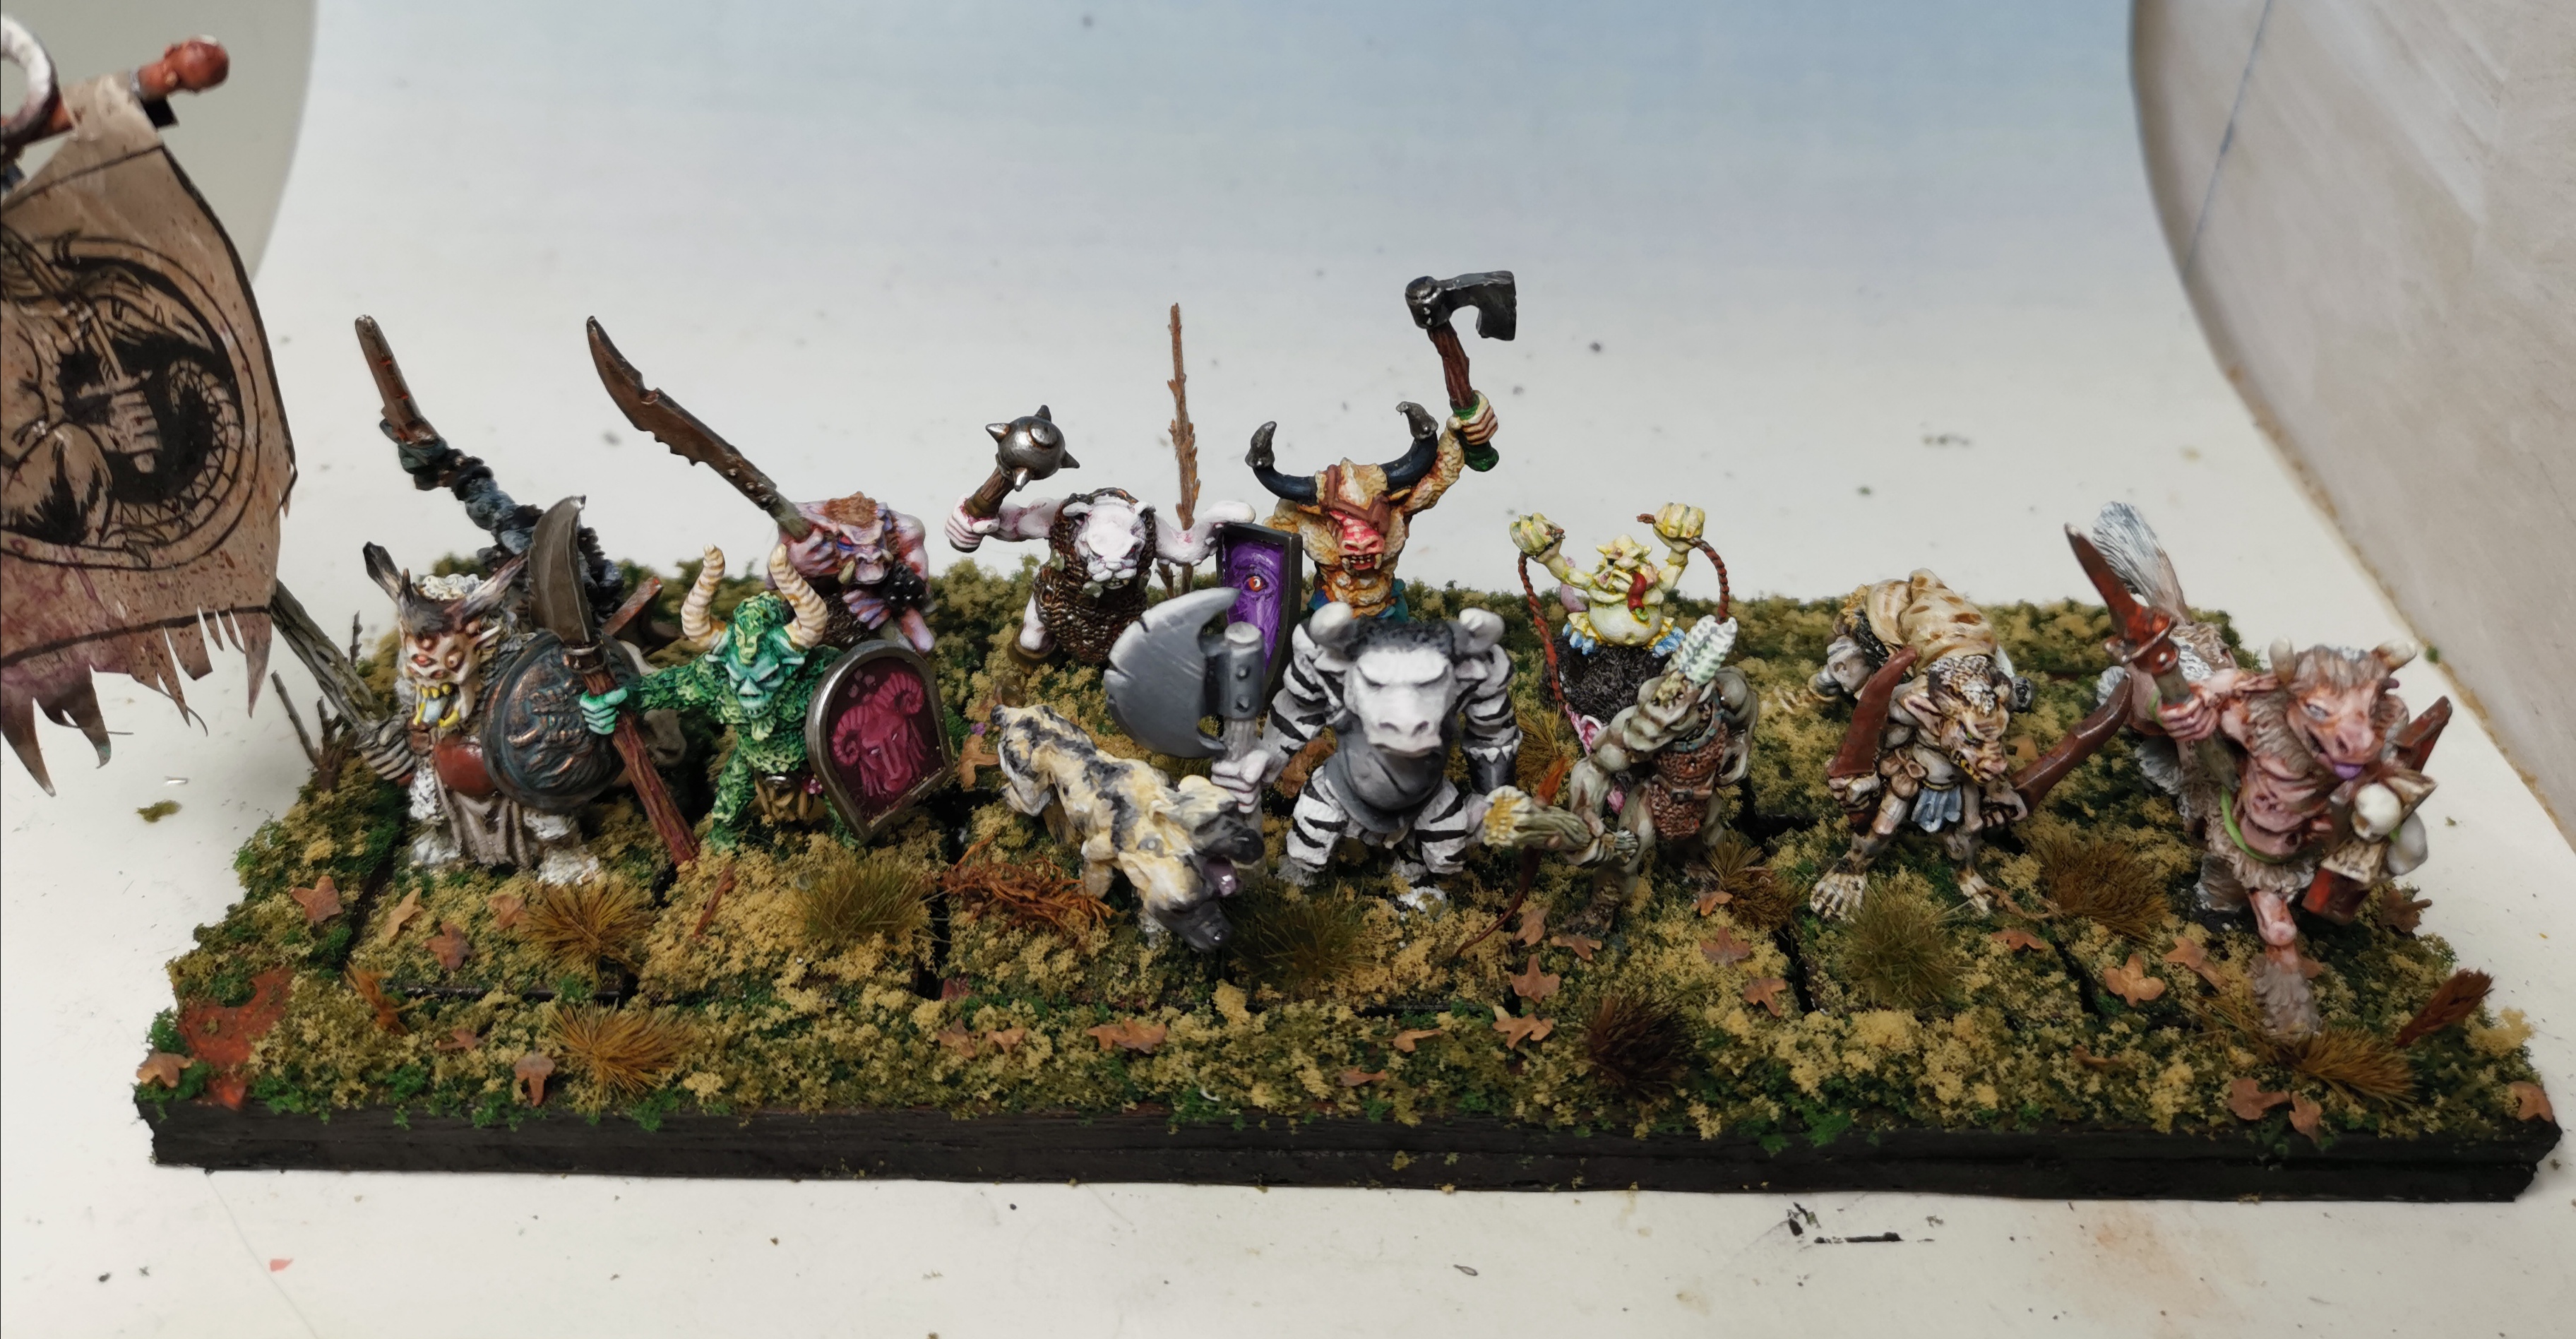
Classic Chaos Beastmen (150pts).

This blog was originally set up, some years ago, to chart my progress in creating a Nurgle army from the classic Lost and the Damned tome. Along the way I have been easily, inevitably and enjoyably sidetracked by a plethora of new ideas, miniatures, games systems and competitions, but for now I've decided to come back to the project and try and complete it! Ive finished my Warhammer 3rd Edition Chaos Allies Contingent, which have the same basing, so I looked back at my many incomplete Lost and the Damned units and decided to tackle the unit which needed the least amount of work.

I had painted half of these classic Chaos Beastmen some time ago, and I remembered collecting them so that they were a disparate, ragtag bunch (certainly not just goats), of different shapes, sizes and races and of course choosing some of my favourite sculpts from this era along the way.

Here’s the now completed unit:


I've painted their skin with a variety of tones, trying to unify them slighlty by keeping the colours slightly drab and pastel like, and as always allowing the basing to tie them together further. 

The banner is painted from an image in Fighting Fantasy's Army of Death and is held by a Beastman that was regularly headswapped in Dale Hurst's iconic Tzeentch warband from White Dwarf 135, something I had always wanted to do since I first saw the article in 1991 and here I've done so with a new, plastic plaguebearer head added to the Citadel lead body. 


Here’s the original illustration  by Nick Williams, as found in Fighting Fantasy: Armies of Death:


The last part was to construct a movement tray, which is really more of a display tray to hold the unit together. More on how I do this in a future post.

So then that’s 14 Beastmen, with standard, making a total of 150pts.


Monday, 20 April 2020

A classic Blood Bowl Elf team.

This project has been trundling along in the background for a while, mostly because the sculptor of these wonderful 80s Citadel Bloodbowl Elves, Jes Goodwin, decided to sculpt a whole load of tiny studs on their outfits. It’s hard enough to paint them all red, I wonder how frustrating it was to sculpt them all with green stuff. At some point he must have regretted doing it as the range grew. However I’m thankful now, because it adds to the character of the team, even if it was a chore at the time.

I’ve long admired these sculpts, from when I was a kid, as for me they could not be more Elven;  their sense of grace combined with prowess through the poses of the sculpts. There is a dynamic feel to the speed and agility of the catchers and yet the blitzers have enough intimidation in their coiled spring and clenched fist pose to do some damage. Then there’s their sense of superiority (we don’t need armour) and their slightly flamboyant and superfluous uniform; long boots, extravagant hairstyles, stockings with studs etc.

With this in mind I went for the most ridiculous and impractical colour scheme; white. Imagine all those grass, mud and blood stains. Who washes the kit? To keep a uniform look to the team, I decided that all the players should have the same blonde hair colour, as the Romanian football team did in 1998 and added touches of red to the cool blues and whites.


The majority of the team are of course Jes Goodwin Elves from the Blood Bowl range, but so I didn’t have to reuse the same models, there’s also a couple of his wardancers in here too with some additions of loin cloths and subtraction of weapons. 


As you can see, my phone struggled to capture the entire team, so here’s a few shots of groups of players.


Here’s one of those re-purposed wardancers, with weapon removed but sling retained!


The model on the right is a conversion I’ve had in mind for some time, I really wanted to capture the dynamic movement you’d expect in such a team sport as this, and I can imagine the Elves as acrobatic gymnasts working together to catch, intercept etc. Ps. One of my favourite models in the range is the kicker.


Another conversion here, this Elven coach on the left is for the Eternal Champions range, Elric Kingslayer. Just removed his weapon and made a trophy from a skull and some bits. Note, he even has studs on his sleeves.


Here’s the StarPlayer, Elril Sidewinder, a classic! I spent a little more time on him and decided that he should have a green hairstyle to set him apart from the team.


And finally a Treeman. I can’t even remember whether Elves/Wood Elves can hire a treeman but the model is so cool and I’ve wanted to own/paint one from whenever, that I don’t care. I went for an old wood feel in the paint job, for two reasons, one he looks old and wooden and two a pale, silver grey would tie him in to the uniform of the Elves. A few brown and green glazes were added and of course he retained the team colours on his helmet and shoulder pad.


Here you can see the small roots I added to his base.


And the two of them together, about to dodge and bludgeon respectively.


The approach to basing also helps unify a team and for these guys I decided upon a cracked earth base with tufts of static grass and a few white line markings on the pitch to provide the bloodbowl context and not just another battlefield base. A few birch seeds for leaves to finish.

Oh and I like the Elves style of play (and the contrast with my Orc team) so I can now play a game against my kids with two painted teams at some point over the lockdown. Yay!


Friday, 22 November 2019

Blood Bowl Elf team - tester


On the back of completing a full WFB unit of 21 Rugluds Orcs, I have decided to try and maintain some momentum with batch painting and paint up my old school Elf Blood Bowl team. There is also another reason, I have an Orc team ready to go and my son and I had a quick game of Blood Bowl using those and my primed elf team (forgot to take photos unfortunately). We had a blast, I scored two touchdowns to win 2-0 but only had 5 players left standing at the end and the result is that we want to play some more - but of course it's always better with painted minis (and a scratch-built pitch... stadium) but lets get the team finished first.

So here is my test Elf player:


Initially I wanted to go blue, white and yellow, much like the Bright Crusaders colour scheme below:


Image result for bright crusaders

but realised quite quickly that with the addition of Elf hair colours it would be too much. Therefore the yellow went towards the Elf hair and the white was combined with a range of blue hues for the teams uniform. A bit of red as a spot colour seems to work and I will look to introduce some halves, quarters, patterns and slashes into the paint design. However I would love to hear your opinions before I paint the rest of the team:


The final element is the basing. I've used the cracked earth paint, with some static grass and leaves. Does it look ok or too barren? Should I gloss it to make it look muddier? Thanks in advance!

Tuesday, 18 April 2017

The Pantheon of Chaos - a warband

This is my first backing of a Kickstarter project and my was it a good choice! You may recall me announcing my pledge and hoping to get my hands on the models in August, well a few months after that date I did get my hands on the sculpts and they jumped straight to the top of the painting queue. 

They are some proper gorgeous miniatures.

First of all they have the character that I associate with the GW 80's style of Chaos which have obviously been a huge influence on me. Secondly they are really crisp sculpts with lots of detail that just shout out to be painted with care and attention and thirdly they work so well as a group/warband; ranging from the leader (who is a great re-working of the classic image in The Lost and the Damned) to his Nurgling-esque apprentice, through to the thugs and the warriors. 

At this point I should say that the PoC crew are putting an online shop together so that if you missed the Kickstarter you can get your hands on some of these models and a choice of a whole load of others. There's a sorcerer and a troll I'm looking to add to this group...

The whole group together, I restrained my desire to convert any of them although I did add a dragons head to the base of the leader (as per the illustration) and decided to go for hex bases to add to the old school vibe.


A wonderfully mutated Warrior of Chaos. I loved the pointing gesture and the armour adorned with a grotesque face. I decided early on to go for a pale blue motif that would contrast with the warm red on the bases. A bit of weathering was added to the metallics too.

The Nurgling-esque apprentice (to have an accompanying sorcerer soon). He actually came free with my order which happily and coincidentally boosted the group to seven models! I went for a nice muted skin tone on him that was based upon my Orc skin recipe. I love his expression and I went for a powerful looking orc on  the end of his staff.

Who wouldn't want a two-headed thug in their warband? They look slightly resigned to the issue especially the bearded one who has to put up with his mate shaving every morning, what a drag!

A second warrior of chaos. Even with all that armour, his attitude still comes through; ready for battle for sure.

The second thug needed to be ginger and slightly green of complexion. Here he is.

Oh and the shields that come with these models are also ace.

And finally the leader. I wanted to paint him in really muted/pastel browns and then constrast the whole lot with a warm red base and a vivid blue dragon head. The basing was totally inspired by the illustration which also inspired the sculpt in the first place:


Oh and the shield, as expected, is awesome.


So all in all a wonderful Kickstarter project. Not only was Diego Serrato very forthcoming with information regarding a few delays with the casting and shipping, but he (I believe sculpted some of these models with some other very talented sculptors - these are seriously good miniatures and were a genuine pleasure to paint up. I hope to have done them some justice! Cheers PoC!