For my sons birthday this year I decided to give him my old Scalextric which I had found in my parents loft a few months ago. Thankfully most of it was in a good condition, certainly the track needed just a quick clean, the hand-controllers and power worked fine and a couple of new cars were bought so that he had some that were fully working on his birthday. It was my old cars that needed the most work and although not quite on the model-making scale of the castle he received a few years ago it has provided me with a new, yet familiar hobby task; a need to collect old bits and pieces, problem solve how to use a range of familiar and unfamiliar materials and techniques, referring back to old classics and of course a new addition; the need for them to be functional!
Here's a photo of the scrapyard and I decided to start with a the Scalextric Porsche 911 from the 80's; when I started this project it looked like this (bottom left corner). Scratched, missing lights, back axle, cogs and just in a general poor state:
To make it function as a slot-car I needed to buy some new axles (the original front one was bent), fresh tyres (the original ones were hard and cracked), some new gears/pinions (the originals had lost teeth and cracked) and some new pick-up braids. Thankfully these are all easy to source on the internet and very easy to fit. My next restoration project a Capri, will feature some soldering and electronics, which I am quite excited about as a more difficult challenge.
Once these tasks were completed and I was satisfied that the car was functional (after a quick practise) I went about the cosmetic changes. After thoroughly cleaning the inside and out with warm water and washing-up liquid, I began the painting process. A black undercoat of our friendly Halfords matt black primer that has been used multiple times on my miniatures, the car then received a nice matt black coat. I then wanted to add some racing patterns and broke out the masking tape and white aerosol to create an off-centre, white, double, racing strip:
I then found a couple of lights that fitted perfectly, left over from a previous build of Fighting Fantasy Freeway Fighter and then went about creating a roof rack for a spare tyre from some plastic mesh:
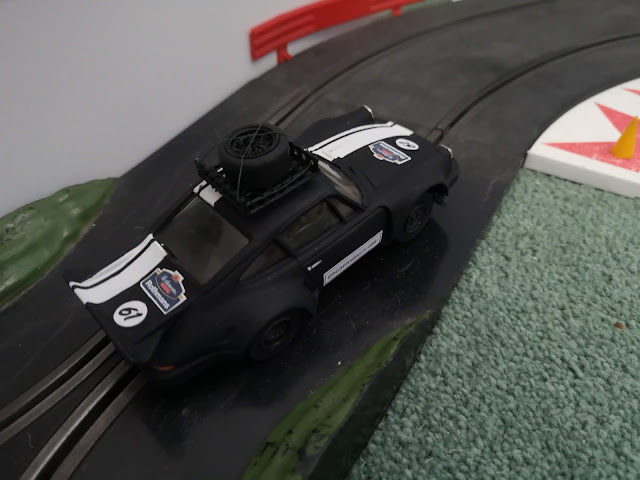
The next stage was to make some decals including racing numbers, sponsors and registration plates. I went with Rothmans Racing as some research into 80s Porsche 911 Rally cars had some examples with that as their sponsor and it just seemed to fit:
These were printed off on an inkjet printer and attached in these positions:
You can also see a bit more detail of the tyre rack here, including the thin wire I used to recreate the straps that would hold the tyre in place. Here's my inspiration:
Several coats of matt varnish later and it was completed. Here's the car where it's supposed to be, on the track:


What a wonderful project, and excellent result.
ReplyDeleteAh my old Scalextrix 400 set with JPS and a Tyrell. 1978 was a good Christmas.
ReplyDeleteOh don't forget Magna traction magnets
ReplyDeleteWhat a wonderful project, totally love it.
ReplyDeleteThe racing stripe turned out perfectly.
ahh i was a rotter back in the day for dismantling my older brothers scalextrix cars with the intention of 'suping them up'
ReplyDeletegreat job you should so mad max these!! :)