Showing posts with label lasercut. Show all posts

Thursday, 20 August 2020

Building some houses

Just before I went on a caravanning holiday with the family around the UK, I made these houses to populate my modular board.


They're both lasercut mdf sets that I picked up for a good price and decided that I should take a break from completing my Nurgle Army (before I burnt out with that project) and sit down with my son and construct and improve these. So we did the assembly together with lots of pva, elastic bands to keep things in place and some coffee.


After assembly my boy decided that one of the buildings should be a shop - we conferred on an Armoury and we then searched my bits box for details to adorn the building. I also wanted to pimp up the kit, the mdf buildings lack detail but more importantly texture. So some polyfilla was added to the walls, cardboard tiles were added and some sand for mossy areas too.


The function of the second building was definitely decided by me. Whilst rummaging around for bits for the previous model, I found a naked dancing girl from Hasslefree and though it would be a perfect sign for a medieval "club". This was placed just above the entrance door. The same texturing and detailing process also took place on this building. 


And then we went onto the painting. Both were undercoated black and then grey from above. Lots of washes of cheap acrylic paint later, followed by some drybrushing and finally some weathering and the buildings were done! As always it was the painting of all the beams that took the most time.


Back to the painting of some miniatures next...
 

Saturday, 21 December 2019

The value of saving time (pre-made scenery)


In trying to keep making progress on a multitude of projects, it can seem quite overwhelming for me, especially when it comes to scratch building scenery. So I've decided to buy a few ready-built pieces to speed up the process of populating my Mordheim boards with laser cut houses and some 3d printed items, which will sit alongside my own scratch builds. I've realised that scratch builds are better for partially ruined buildings and ready made scenery for complete buildings, the reason being that purchased/mdf buildings look too pristine for ruins and scratch built ones can be a bit more rough and ready and therefore a bit quicker to make. That's what I'm leaning towards for now anyway.

So here's the lastercut building, assembled and painted:


With smaller, detailed scatter terrain I used to steer clear of 3d prints as the level of finish with the typical horizontal striation lines was far too distracting on items that need to stand up to close scrutiny, however the prints are improving and I can hide any unwanted 3d printing texture with some painting techniques (such as stippling over the top to break the lines or even introducing deliberate vertical painting lines). So here's my 3d printed well and doors to the depths:


Part of the idea with these is that they can be links to an underworld gaming environment and therefore link my modular town tiles to my modular dungeon ones (this is an idea for an upcoming narrative game)

Here's a few glamour shots  for now:


 A


Monday, 13 May 2019

Lasercut House #2: to drybrush or not?

The second lasercut house is now complete and finished in double-quick time. Being such clean kits they are very easy to paint with none of the hiding of errors I usually have with scratch-built versions. Again, painting the beams black from every angle was the biggest pain and again I wished that I had sprayed them black before gluing them down. However, I'm really pleased how this one turned out, even though a quick dark grey drybrush over the beams would probably help; do you agree?

It was originally designed with a watermill attached to it's left side, but that made it too specific for me and preferred a more versatile townhouse. 


And together they both look pretty good, almost designed to go next to each other, but will of course look ace when I eventually get back into the attic and re-set my scenery set up once the proper building work in my proper house is completed.


Friday, 3 May 2019

Lasercut house #1 "Dolls House Dilemmas".

I've completed painting my first mdf laser-cut house and I'm really happy with the results. I think doing a little extra work on the design in terms of making individual roof tiles and burrowing out the mortar between stonework created enough texture to make a more realistic impression and definitely made the painting stage a little easier as texture = dry-brushing!


I spray undercoated the build in grey and then used this colour as a base for the grey in between the beams. All of the rest of the painting was completed with tubes of acrylic paint (Daler-Rowney in this case). Subsequent greys (lighter than the undercoat) were dabbed into these areas between the beams which meant  that I then needed to re-paint the timbers matt black which was incredibly tedious as that process included the face of each timber as well as the top, bottom and sides. Touching up the windows with white was of little fun either.

Thankfully painting the stonework was quick and easy, using yellow-greys to create a sandstone appearance, followed by a range of terracotta hues for the roof tiles. Both of these were easily dry-brushed with slightly lighter shades to bring out the texture and light/shadow.


The final stage, my favourite stage, is the weathering which always surprises me in how easy it is and how quickly it unifies a paint job. Successive, very dilute layers of a variety of dark greens (eg. Hunters Green - my go to weathering green) and browns such as Burnt Umber and Yellow Ochre were used to streak the weathering from top to bottom. The appearance of moss was dabbed on slightly less dilute along the bottom of the stone work and in areas of shade - for example where the chimney meets the wall and where the pillar meets the stone floor. And that was it, first one down, although I might one day decorate inside too...

Part of me thinks that is an unnesecary job when there are so many other hobby ideas and tasks to do, but the Interior Designer in me disagrees. And I quite like a photo opportunity where my models can be placed inside with rugs and barrels etc. Dolls House Dilemmas.


Wednesday, 24 April 2019

Lasercut MDF buildings and Salute

Earlier this month I took my first trip to Salute, having seen and heard many a great thing about the event in London. I could only visit for the afternoon, so time was short but I managed to see lots of amazing set-ups, boards, games and stalls, even if I did not have time to actually game. 

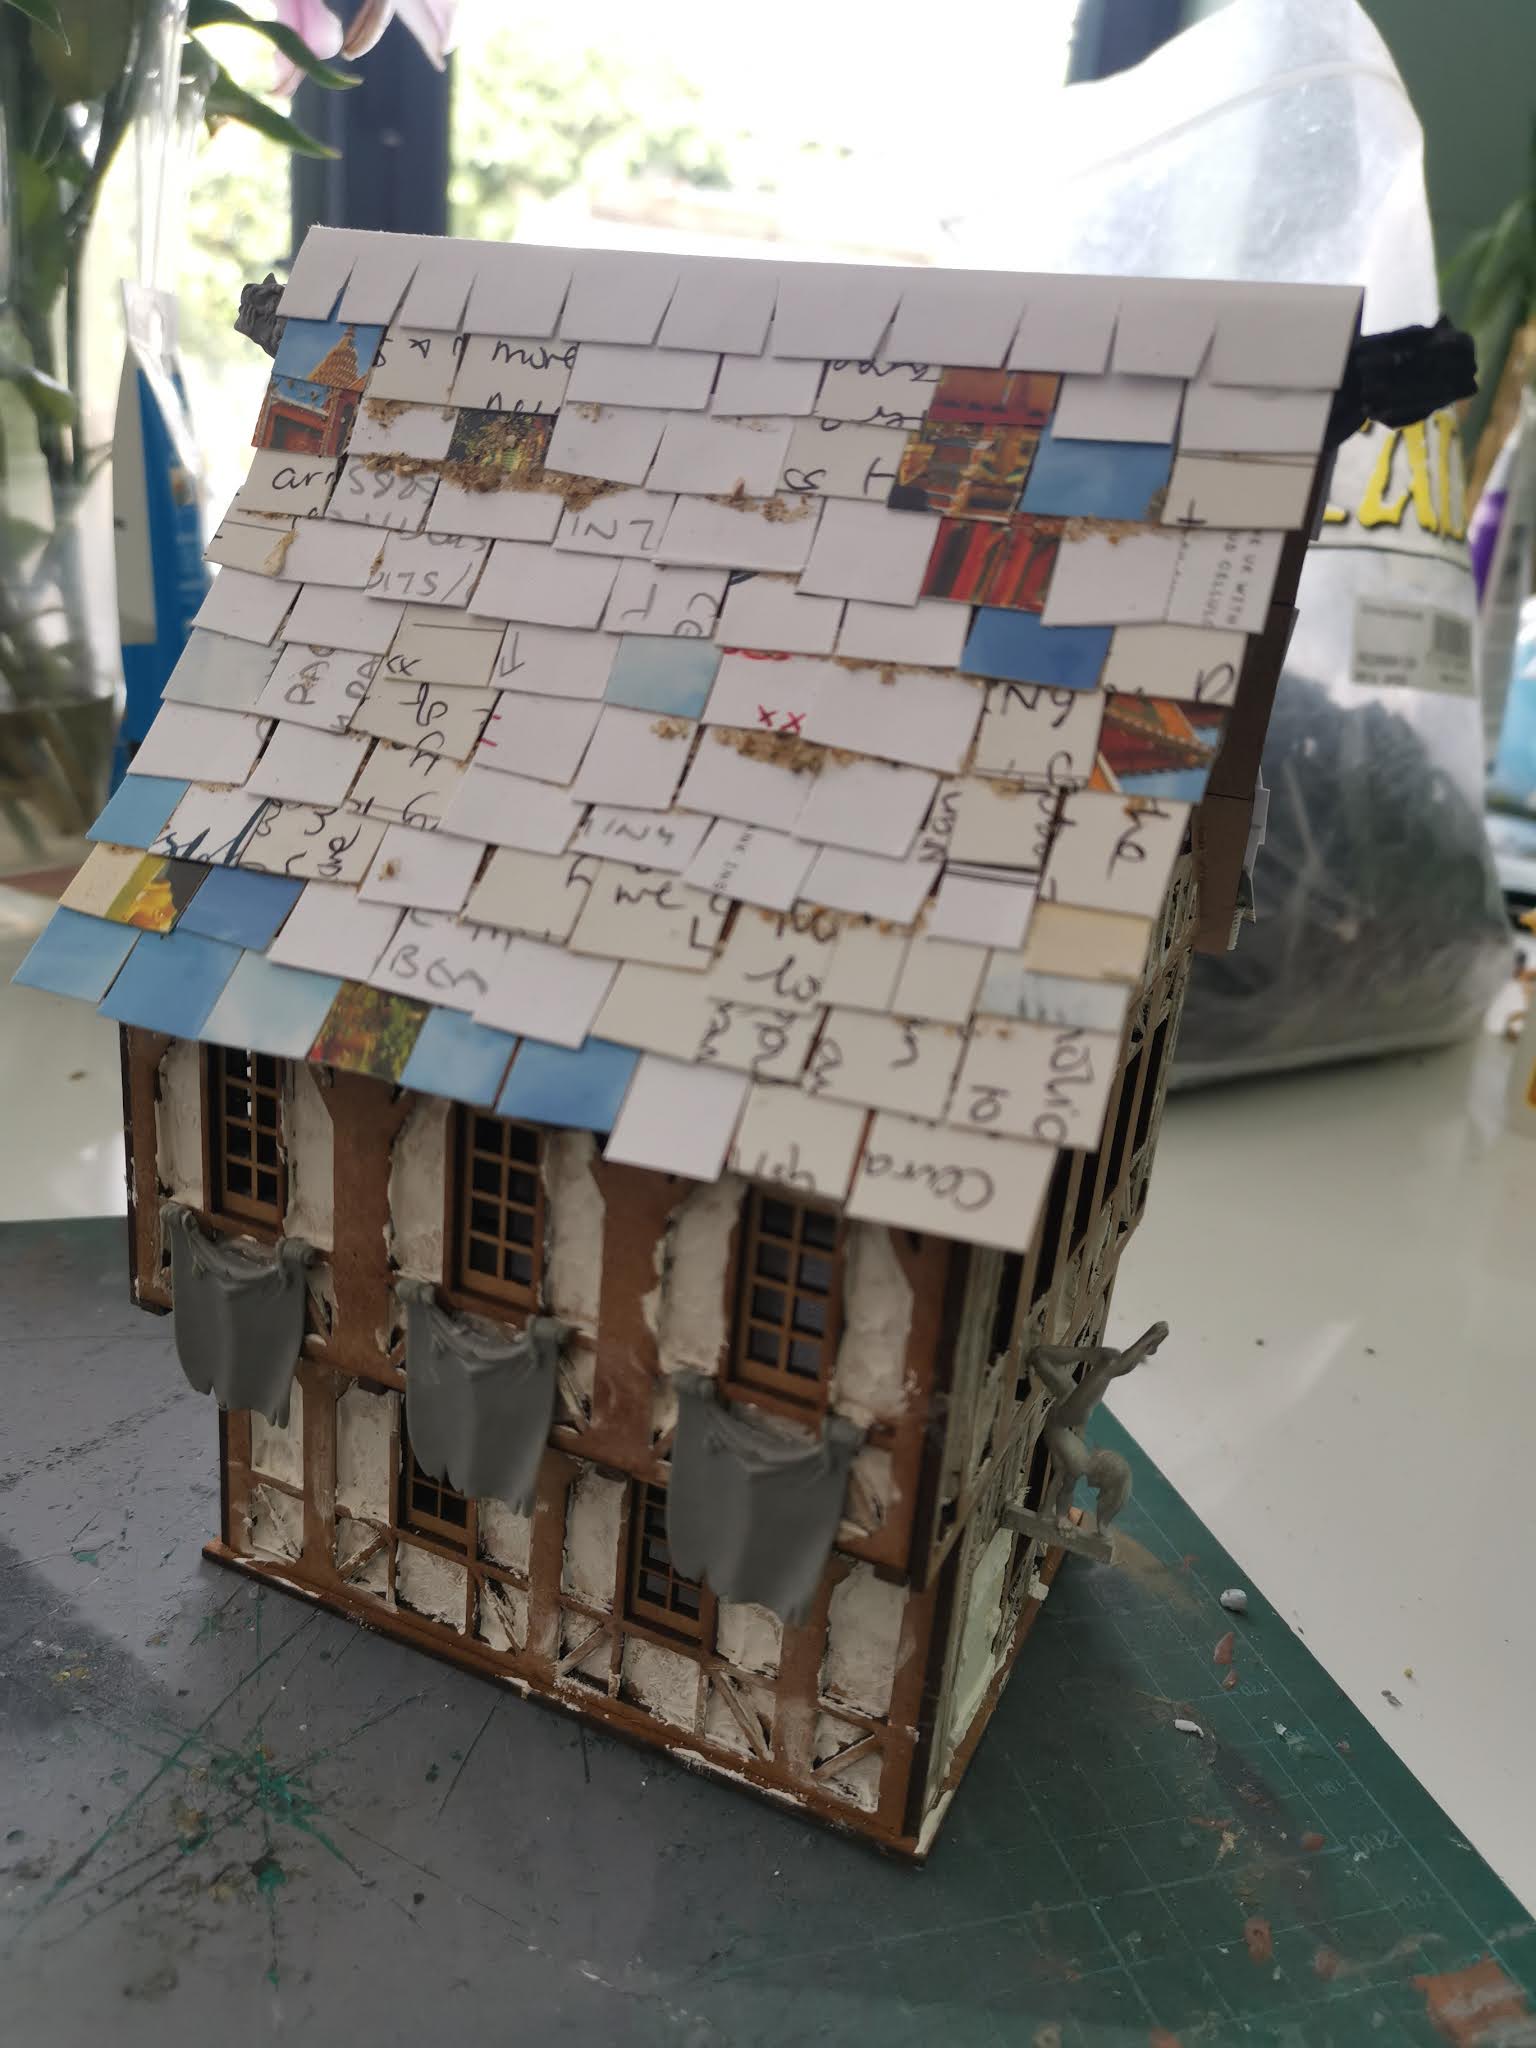
I have plenty of models to paint, so even though I was very tempted to buy some Mierce monsters or some Hasslefree adventurers or some of the other amazing (and unknown to me) company's models, I decided that I wanted to try out some of the lasercut scenery. I eventually settled upon the below, both at about £15 each from different stands; unfortunately I have forgotten the names of the brands now. Below is a three storied Tudor manor house; each layer comes apart:


As you can see, I have made a few moderations. Even though the kits are wonderful in terms of how easy they are to construct and how good they look as scale buildings, they do understandably, lack any texture. This is most obvious in the roof and and the brickwork. So I reverted to the tried and tested cereal packet cardboard shingles for the roof and decided to carve into the mortar between stones as seen below. This technique did not take as long as expected because the laser cutter had created an outline that had enough depth that meant that I could dig out a layer with my scalpel for the stone work to remain raised.


Below is a watermill model, where I just did not add the watermill to the side. I've made the same moderations as above to improve the texture of the building. I'll probably add some sand/pva for some mossy areas too.


On reflection, these mdf lasercut models are very easy to work with and relatively cheap too. They are certainly quicker to put together than any of the scratchbuilt/foamcard models that I have previously made. I think they will sit well alongside each other and I intend to continue investing time and money into both. Scratchbuilding will lend itself well to some of the more unique ideas for buildings that I have.

I also had time to enter the 'Eavier Metal speed painting competition. We were given a Mantic model, some paint (in bottles and already out on a palette, some brushes, water and 20minutes to paint. It was intense! Being out of my comfort zone (not having my own equipment) an audience (I had one woman leaning over my shoulder as I painted!) and a time limit was sweat inducing and I had to make some very quick decisions about colour schemes based upon the colours that were available. I jumped into the skin tones first, going for multiple washes and tried to paint other areas as they dried. My hand was not as steady as I was used too and I really struggled when it came to doing some quick highlights and details. The time flew by and I just about managed to finish and was lucky enough to be chosen by the judges as a winner for my group! I won a lovely Eavier Metal mug for my efforts!


Salute was great, next time I will make sure I have time to get some games of new games in and maybe meet up with a few people I know.
Painting of the buildings is underway and I will post updates on those next.