Showing posts with label Mantic. Show all posts

Saturday, 23 May 2020

28 Plague Zombies and Plague Cart (185pts)

The diversity of the Nurgle Army list in the Lost and the Damned tome, is one of the most appealing features in my desire to create an army from it. I love the Zombie concept and the list allows me to have a unit of them amongst my Nurgle legions. I'm not a fan of any of the GW zombies, whether lead or plastic, past or present, but I am a massive fan of the Mantic variety and about 5 years ago I bought a load of them and skeletons in some deal. 
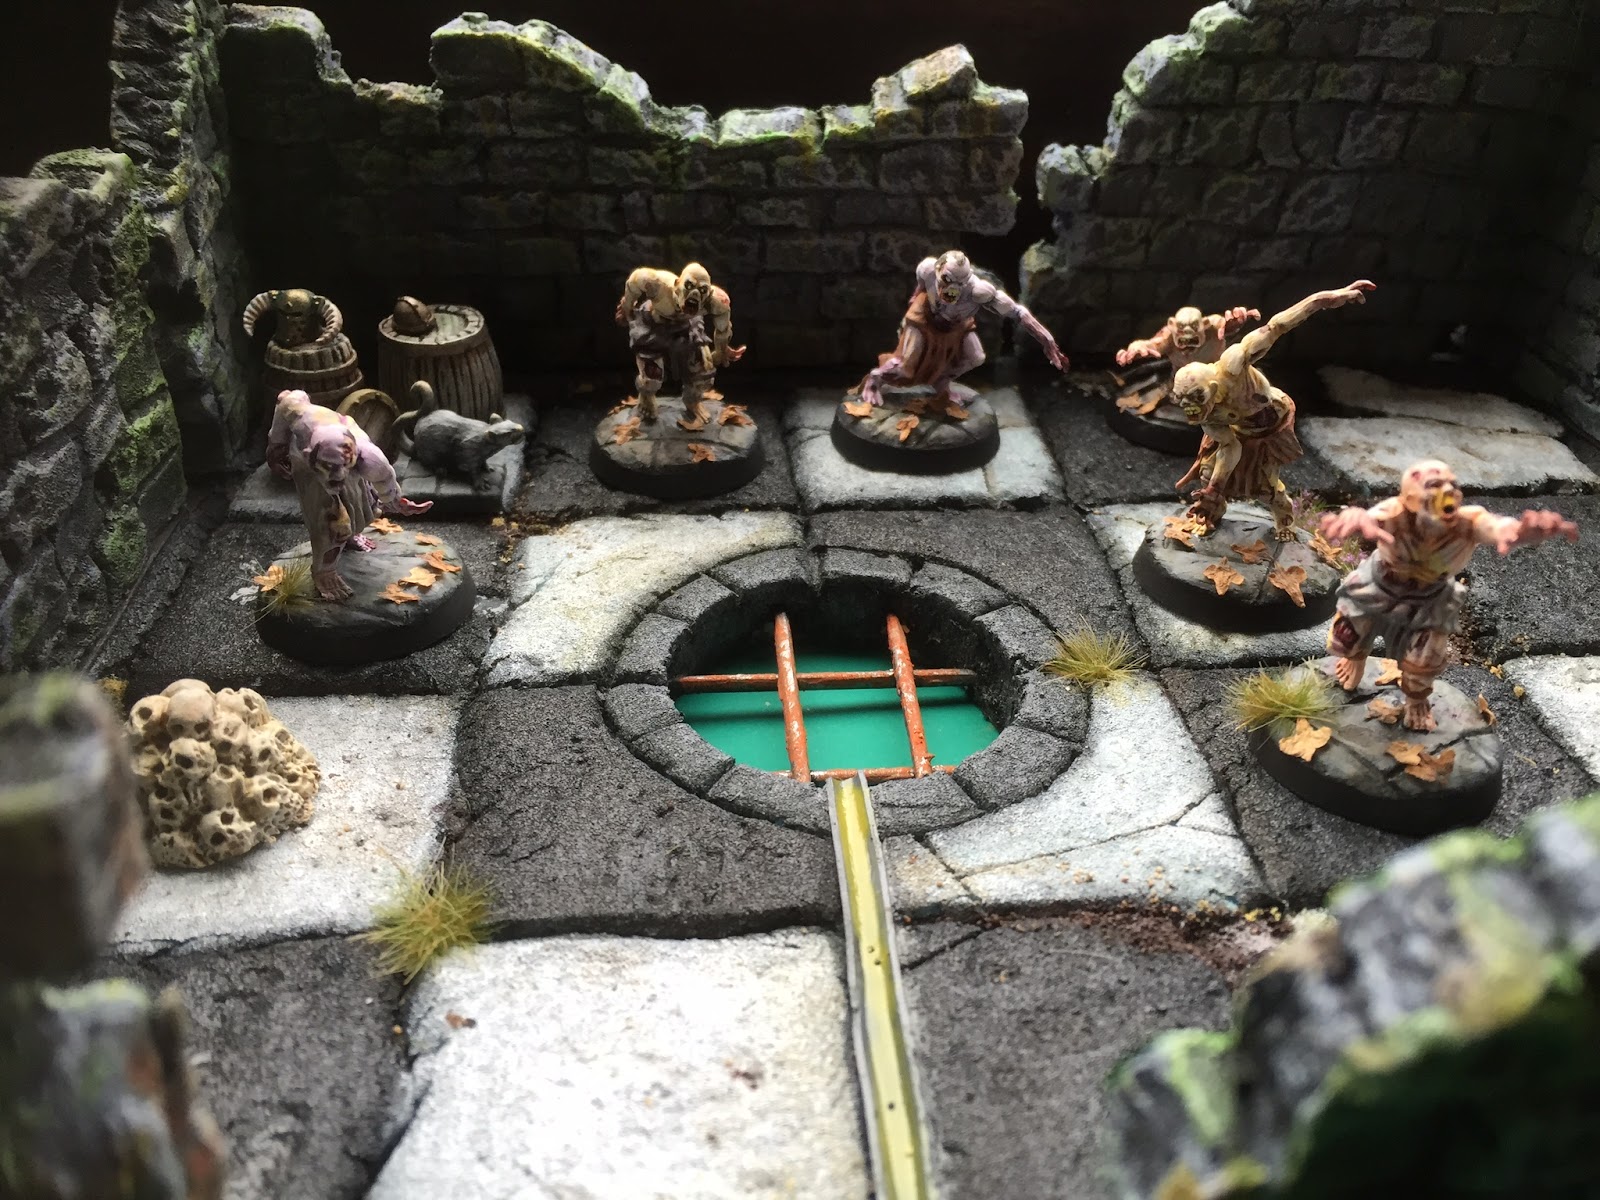
They really are a very good plastic kit, the multi part element gives lots of options and with a little imagination in reposing you can easily create that wandering, shambling horde look as the zombies stumble towards their prey enmasse. I'd painted about 10 of them back then and now 5 years later, I've finished the other 17, the Sorcerer and the movement tray. The painting was over the top of a white undercoat and was comprised of a succession of washes and glazes of yellows, browns and greens and then for blood, purples, browns, blacks and reds. 


Here you can see a wip photo of the painting process, as well as the variety of shambling poses:


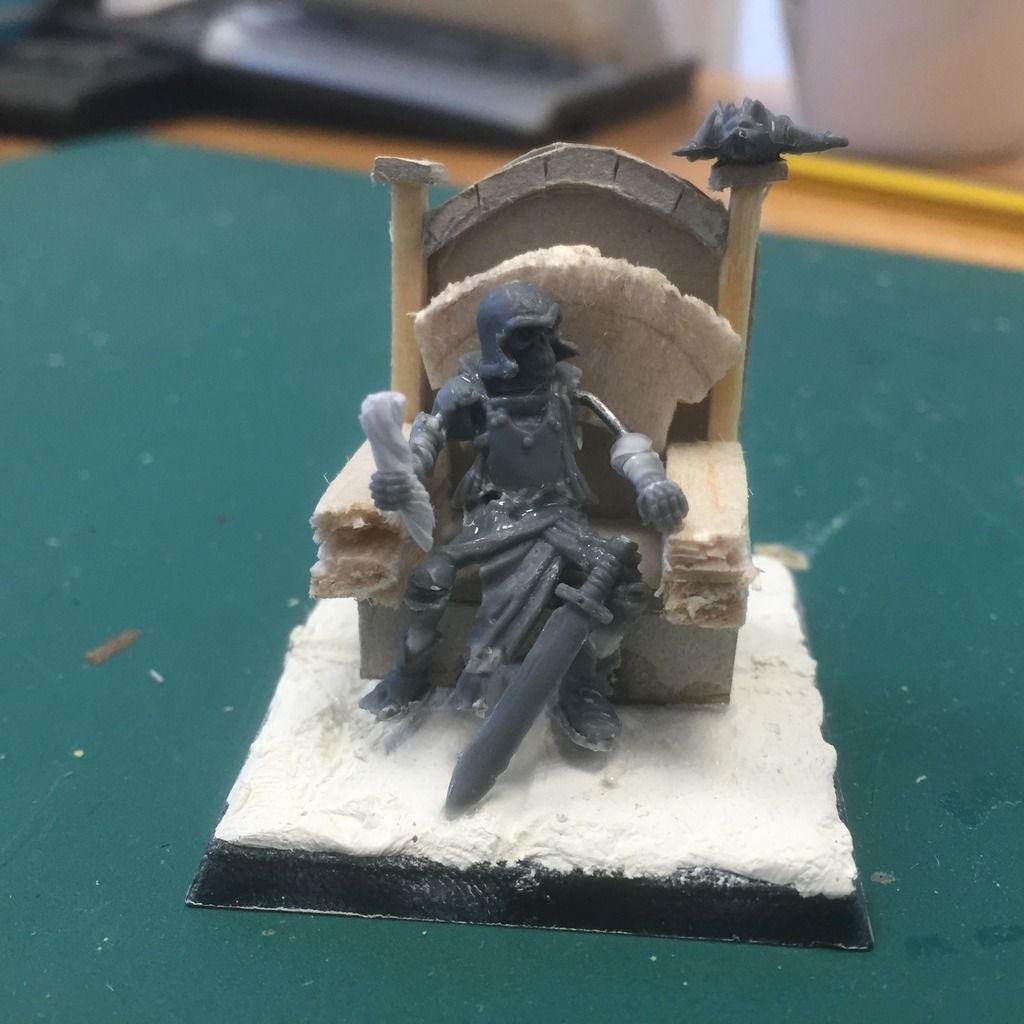
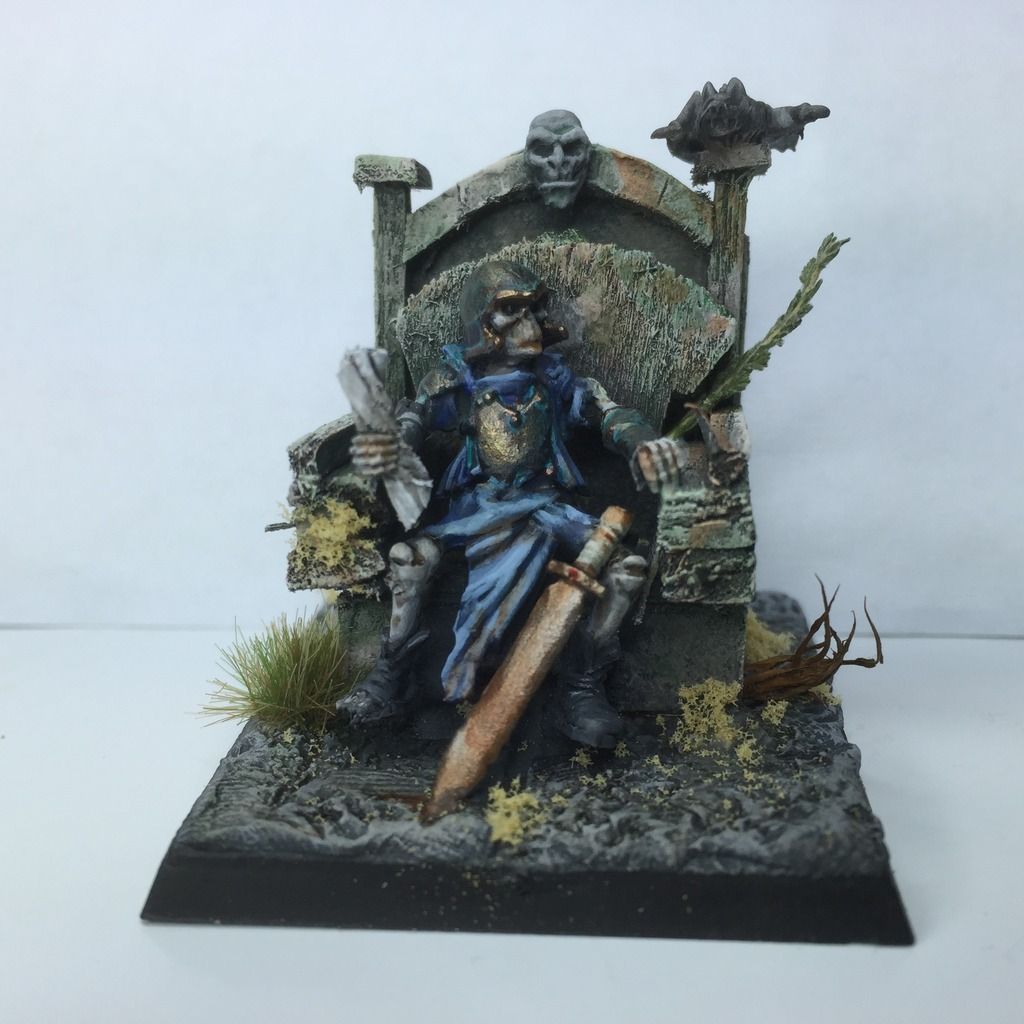
Zombies generally need a Necromancer to animate them so I've included the option for a level 10 Undead Hero, which in this case, for narrative reasons, is an Undead Nurgle Sorcerer.


Now this is far from my favourite ever Nurgle model, but I had it for some reason in my bitz box and decided to try and improve it. Off went the silly, crooked hood and over the top staff and a horn and skull were added respectively. 

The Lost and the Damned also allows for skeletons, but I'm not keen to include them, I don't want this to be too similar to an undead army, however it does allow for a Plague Cart, for free (!) which of course is very NURGLESQUE and can be part of the Calvalcade that I have in mind later for this army. This was painted a few years ago for the annual Deadcember competition and I was lucky enough then to win a prize for it, a Zombie dragon. But that's for another day and another army... 


So 28 Plague Zombies + Level 10 Undead Hero + Plague Cart =185pts.

The current cumulative total for the army now exceeds 2000pts at 2055pts. 

Until next time...  


Wednesday, 24 April 2019

Lasercut MDF buildings and Salute

Earlier this month I took my first trip to Salute, having seen and heard many a great thing about the event in London. I could only visit for the afternoon, so time was short but I managed to see lots of amazing set-ups, boards, games and stalls, even if I did not have time to actually game. 

I have plenty of models to paint, so even though I was very tempted to buy some Mierce monsters or some Hasslefree adventurers or some of the other amazing (and unknown to me) company's models, I decided that I wanted to try out some of the lasercut scenery. I eventually settled upon the below, both at about £15 each from different stands; unfortunately I have forgotten the names of the brands now. Below is a three storied Tudor manor house; each layer comes apart:


As you can see, I have made a few moderations. Even though the kits are wonderful in terms of how easy they are to construct and how good they look as scale buildings, they do understandably, lack any texture. This is most obvious in the roof and and the brickwork. So I reverted to the tried and tested cereal packet cardboard shingles for the roof and decided to carve into the mortar between stones as seen below. This technique did not take as long as expected because the laser cutter had created an outline that had enough depth that meant that I could dig out a layer with my scalpel for the stone work to remain raised.


Below is a watermill model, where I just did not add the watermill to the side. I've made the same moderations as above to improve the texture of the building. I'll probably add some sand/pva for some mossy areas too.


On reflection, these mdf lasercut models are very easy to work with and relatively cheap too. They are certainly quicker to put together than any of the scratchbuilt/foamcard models that I have previously made. I think they will sit well alongside each other and I intend to continue investing time and money into both. Scratchbuilding will lend itself well to some of the more unique ideas for buildings that I have.

I also had time to enter the 'Eavier Metal speed painting competition. We were given a Mantic model, some paint (in bottles and already out on a palette, some brushes, water and 20minutes to paint. It was intense! Being out of my comfort zone (not having my own equipment) an audience (I had one woman leaning over my shoulder as I painted!) and a time limit was sweat inducing and I had to make some very quick decisions about colour schemes based upon the colours that were available. I jumped into the skin tones first, going for multiple washes and tried to paint other areas as they dried. My hand was not as steady as I was used too and I really struggled when it came to doing some quick highlights and details. The time flew by and I just about managed to finish and was lucky enough to be chosen by the judges as a winner for my group! I won a lovely Eavier Metal mug for my efforts!


Salute was great, next time I will make sure I have time to get some games of new games in and maybe meet up with a few people I know.
Painting of the buildings is underway and I will post updates on those next.


Thursday, 18 August 2016

Dungeon doors

So with a-level results day done for another year (one of my department's most successful too), I've been able to come home to an empty house and have a bit of time to finish up some painting and take some documenting photos and a few show-off ones too. Over the last few posts on my dungeon project, I've been referring to a range of manufacturers models that I've used; for example Grendel Scotia for their scenery, Dark Arts Studios for their treasure chests and Milton-Bradley for their original Heroquest furniture. Today it's the turn of Mantic and their relatively new dungeon doors which I picked up recently from eBay (after some poor attempts at scratchbuilding). You can see that I've added a magnetic strip to the bottom of the doors so I can incorporate them to my modular dungeon tiles:


They are really nice simple sculpts and you can see you get two of each door design. I decided to add some detail from my bitz bix  on some of these, that may help add an extra narrative later to my games:

"..at the end of the dank corridor you see a small, aging door with a white cross painted crudely over the bare wood. If you wish to open the door turn to page 231, if you would like to blow your bone whistle, turn to page 94 or if you have spoken to the hunchback,  turn to the appropriate page  number".

I've been rereading some of the dungeon based Fighting Fantasy novels - Creature of Havoc, Deathtrap Dungeon, Trial of Champions - actually in numerical sequence from 1-300, just to pick up some nice detail from the written word as much as the illustrations to add to my dungeon oeuvre. I've written a whole list of ideas that i can add to my walls, future doors etc and I've also noted down all of the monster encounters with this vague idea of collecting, painting and gaming with some sort of combo of 3rd Ediion Warhammer, Frostgrave, Heroquest and Fihhting Fantasy stats. More on this in a seperate post. Needless to say that my copy of Out of the Pit has resurfaced to be left in different spots around the house as I pick it up and put it down.

So back to the doors. These were painted very quickly. A quick tidy up of some small mold lines. Primed grey (the actual pieces come on a brown plastic) and then black washes on the stone. When this is dry I drybrushed some lighter greys over the top with the lightest colour (almost white) applied to the corner edges of each stone. For the wood I used a combination of lots of different washes from chestnut ink for the redder doors, to sepia, Browns and greens for the other colours. I usually apply the washes after highlighting, but I decided to work the other way around, and it was actually much easier.. So after the washes on the wood were dry and then chose the appropriate wash colour, mixed in some white and painted on no more than three accessibly lighter lines that followed the grain of the wood. Done. Details that I added from my Bitzbox and that were already on the doors, like hinges etc needed a bit of time (I always curse my previous self for going over the top on adding extras when my current self has to paint the bastards) and then some wearhering washes using the same colours as on the doors were applied over the stone. Not including drying times, I reckon each door took 20minutes tops.

I will return to my scratchbuilt attempts of doors, but I need to move on to some other manufacturers stuff to add to my stuff....


Friday, 12 February 2016

Frostgrave Bestiary Challenge: 12 Armoured Skeletons

I haven't painted in batches for some time, since the days of my orc and goblin army many years ago. I soon rediscovered the tedium it brings during painting, especially when you think you've painted all those leather straps (with highlights) and then find one thst I missed requiring me to break open the snakebite leather and white again... However the satisfaction, in fact joy, of finally painting those paint rims black, is almost worth it. It felt like I'd never had such a gush of accomplishment. The sculpts are pretty uninspiring, but at least the very nature of skeletons means there is a pretty limited palette and there's no need for the repetitiveness of painting a multitude of eyes, hair, glazed red cheeks/noses etc. Oh and I sped up the process by undercoating grey rather than white as most of the colours on these (from bone, to rages, to shields) used grey as a basecoat.

I had a bit of trouble with my old Citdael transfers, they didn't adhere very well to the shields, probably because of their age, and had to be enticed to stay in place with some dilute pva. Which was annoying x12.

Eventually, when the oxidation of their bronze and metal armour was completed and some other general weathering was added, I was pretty happy with how they look; here they all are in a ruined city:


Wednesday, 10 February 2016

Frostgrave Bestiary Challenge: 6 zombies

I've added a new gadget to the right which is another to do list / completionist project that I've set myself; to paint all the models that could be needed for Frostgrvae. Why? I ask myself (or you may ask). Well I've got a pile of miniatures (not all lead) that need to be painted and with the help of lists and project ideas I can choose carefully from them to help me paint in a structured and efficient(ish) way. It gives me some way of accomplishing a secondary feat (crossing them off and tracking my progress towards a goal) to just the completion of painting a model and helps my mind plan ahead with a clear direction. I probably should have waited until I'd finished one of these previous lists (be it another set of dungeon tiles or the Nurgle retinue table) but it does mean I've got a nice eclectic mix of models to paint up over the coming year. And I'm sure there will be some currently unplanned, list additions along the way too.

Today I painted some Mantic zombies to add to my growing undead horde; for Frostgrave and Heroquest. Very simply these were undercoated white and a multitude of thinned glazes were applied directly over the white  to the skin, ranging from purples, blues, oranges, greens and yellows. I used some darker blues around the yellow areas to create bruising and also around the eye sockets to create some depth and a certain tired/dead look.. Some dried blood was added with a combination of red, purple and black inks applied liberally to the wound areas, mouths and hands. Small dabs of Tamiya clear red were then applied into the wounds to make them looks but fresher, as if they were still oozing a bit. So here are the zombies:

I must add that layer of green/yellow paper to represent the slime under the grille.


Monday, 8 February 2016

Frostgrave Bestiary Challenge: 5 Skeletons and a dog

As I recover from an acl operation, I've slowly been able to get back into some painting, as I'm now able to sit in a suitable painting position for longer periods of time. I have next week off work and then it's half term, so I hope to be quite productive over the next fortnight; we shall see.. For now though I've quickly painted up 5 Mantic skeletons (and a skeletal canine) as the first installment of my new "Frostgrave Bestiary Challenge". It will run alongside the creation of new dungeon tiles and the slow progress of my "LatD Retinue Table Challenge".

So here they are in their dungeon room, retreating from your approach:


And some photos in a slightly better light, where they try out a few new formations:


I decided they should all have basic armour and spears to differentiate them from their armoured  brethren. The quickish painting technique was as follows:

1. Under coated white, the bone was then based with baneblade brown then highlighted/drybrushed up with a mixture of the base colour combined with increasing amounts of bleached bone. A wash of seraphim sepia to tie it together and a final highlight of bleached bone. 

2. Armour was boltgun metal then washed with a chestnut ink/nuln oil combo and small highlights added  with chain mail. Rust was added with red ochre pigment bound in some matte varnish.

3. All other pieces were under coated in appropriate colours (mostly a range of browns) and then washed with earthshade. On a few of the prominent areas they were re-highlighted with the original colour plus a touch of white.

4. The shields were painted the same way as 3, but with some old Citadel transfers added. When dry these were coated with matt varnish and a touch of blade town brown to dirty them up  (in fact this recipe was also applied around the feet and other areas to help create the duty appearance).


I decided not to go with glowing eyes in the end, I'm still unsure though and may add that detail when I've painted the remaining Undead legions... It can look very good indeed. Thoughts? 

Friday, 29 January 2016

Enter the Undead

I've created lots of warbands (here, here, here and here) to play Heroquest or Frostgrave with, but I don't have any wandering monsters painted up on the appropriate bases to fight against, yet. Once again Frostgrave has inspired me to get some of my miniature pile painted; so I rummaged through my box of Mantic undead and found some skeleton and zombie sprues initially and then I remembered that I had the Ghoul Warband from Heresy and finally an old Citadel Chaos Warrior who works perfectly as a Vampire/Necromancer character. Oh and a Lord of the Rings model to be used as a Wraith (I have no idea where or why I collected that one..)


So here are all the Undead assembled and based, ready to start painting:


I found a really useful online guide which lists the maximum amount and the full range of monsters which are needed to play Frostgrave - and I like lists to help focus my collecting impulses. So here's what is needed for the Undead contingent:
  • 12 Armoured Skeletons
  • 9 Ghouls
  • 5 Skeletons
  • 1 Vampire
  • 1 Wraith
  • 6 Zombies
Yes that's 34 Undead miniatures to paint...


And all the other creatures in the Bestiary (some of which I already have and some others which I will need to purchase):
  • 2 Bears
  • 1 Boar
  • 4 Giant Rats
  • 2 Spiders
  • 3 Toads
  • 2 Snow Leopards
  • 1 Gorilla
  • 2 Wild Dogs
  • 3 Wolves
  • 2 Large Constructs
  • 2 Medium Constructs
  • 2 Small Constructs
  • 1 Imp
  • 2 Major Demons
  • 3 Minor Demons
  • 1 Giant
  • 6 Giant Worms
  • 2 Trolls
  • 1 Werewolf
  • 1 Genie
  • 6 Statues
That's a significant addition to the [not so] miniature pile and the painting queue... Let's get to it.

Wednesday, 11 November 2015

Deathtrap Dungeon: Ian McCaig's iconic illustration re-made

I'm in the process of constructing a throne room for my dungeon tile project and along the way I happened to pick up my copy of Fighting Fantasy's Deathtrap Dungeon for some easy reading. As I was looking through I re-discovered the classic image by Ian McCaig of the skeleton, sitting on his throne, scroll in hand. It's an iconic image that I remember well from my youth and then I had a thought; a model recreation of that image would be the perfect centerpiece for my throne room dungeon tile.

So I set off with some balsa wood, card, a bit of paper (for the scroll) a Mantic skeleton, some bitz and some paints and I created this:


The painting took no time at all, lots of drybrushing up the highlights over a black undercoat and then washing in browns and greens for some weathering. I went for a faded blue on the tunic as I imagined that he was once of regal blood and with all the neutral colours he needed a spot colour to make him pop.

The barrels are from Dark Art Studios dungeon range with a few additional bitz added to create a bit more of a narrative ad interest.


Here's the work in progress shot showing the construction of the model. I had to bend the knees to snapping point (then reconstruct his right kneecap with greenstuff) and both arms were snipped and re-positioned with the aid of a paper-clip. I built the throne and the skeleton at the same time so that I could check he would fit on it with the arms rested on the arm rests and the legs actually touching the floor. The arm rests became wider than I hoped but overall the throne isn't too big (it was at one stage..)

And here's the iconic illustration that started me off on this small, but fun, diversion, with a comparison shot below:

The throne room which he will take pride of place, is in the latter stages of painting, so not far off. I'm quite excited to see him within a scenic space. Sad!

.

Monday, 8 September 2014

More Mantic Zombies


Just a quick post today. I really love these Mantic zombies; they're so easy to put together and convert, if you so desire and the level of detail on the sculpts make them fun to paint too. So here's another 9 to add to the group:


I shall take some individual photographs to show the level of detail, and the way I painted them, on my next Zombie installment as I approach what is suspicously looking like a completed unit of models..... I may have to even make a movement tray!

Saturday, 2 August 2014

Decorating and Zombies

I've just finished my first full week of the school summer holidays and have triumphantly decorated the living room, much to the happiness of the wife. I don't know how many times I've had to traipse to B&Q and back though...:


There is a correlation with my hobby I realised, everything is just scaled up - so instead of trimming mold lines with a small scalpel I've been sanding floorboards with a heavy duty, powerful electric floor sander. Applying primer with a roller rather than a spray can and adding layers of paint with a huge decorating brush rather than a Windsor and Newton Series 7 size 1 brush! Now I consider myself quite skilled with a brush, but boy do I struggle with skirting boards, perhaps I should have reached for one of my smaller, hobby brushes for the corners....

In the evenings I have treated myself to some hobby time and have had to adjust everything back to a miniature scale - which each time took a little while - my painting seemed slightly heavy-handed at first. So the first 7 Mantic zombies are complete awaiting another couple of batches of 7 which I'll start sometime soon:


 These guys will be making an appearance at BOYL 2014 (next week!) and I hope to add to the completed list before then, now the decorating is done and I'm in the wife's good books!

Tuesday, 22 July 2014

Some Mantic Zombies

A little while ago I got hold of some of the Mantic zombies with the idea of starting up an Undead army (another one of those "plans") but never got around to it and the box of miniatures languished, in a torpor, under my bed, amongst old shoes and some of my wife's unused handbags.

So with my Nurgle Sorcerer painted and looking increasingly like a Necromancer I decided to put the zombies together and add some paint - I'm now thinking that this will eventually be a unit of Plague Zombies as described in the army list pages of the Lost and the Damned. Perhaps I'll add a plague cart and some skellies too....

So WIP:


I've used multiple washes and glazes over the white basecoat (using a dash of washing up liquid as always) and tonight I'll add some layering to the clothed areas, some blood splatters using red, purple and black ink mixtures and complete the bases and smaller details.

I love this Zombie kit and would heartily recommend it to anyone.